TopsDecor.com Home Decor Ideas
Leaky taps are undoubtedly very annoying. It also consistently wastes water. Wasted water is undesirable in all conditions. It is harmful to a sustainable environment and also to your bag. A faucet wears out over time and leaks are common. Fixing a leak is very easy and one of the do-it-yourself tasks. You can do this by following a few simple steps. Here you will find all the necessary steps to repair a leaky compression valve.
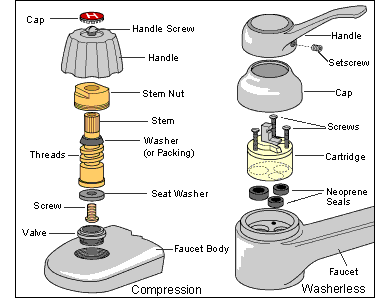
First of all, you need to know something about compression taps. Taps with a compression disc are known as compression taps and have survived for a long time. This old model of faucet is mostly found in older homes. You use a washer and the compression is achieved by tightening the faucet handle. This tightening turns off the water. It is normal for the washing machine to wear out over time and therefore the water does not stop completely. You can easily fix this just by replacing the washer by following some really simple steps. If you want to change the tap completely, there is a great resource Top rated bathroom fittings.
Proper preparation gives you the upper hand while repairing a leaky tap yourself. We mentioned earlier that the steps to fix a leaky faucet are very simple. You can get the best result by following these steps step by step. Let’s start with the steps.
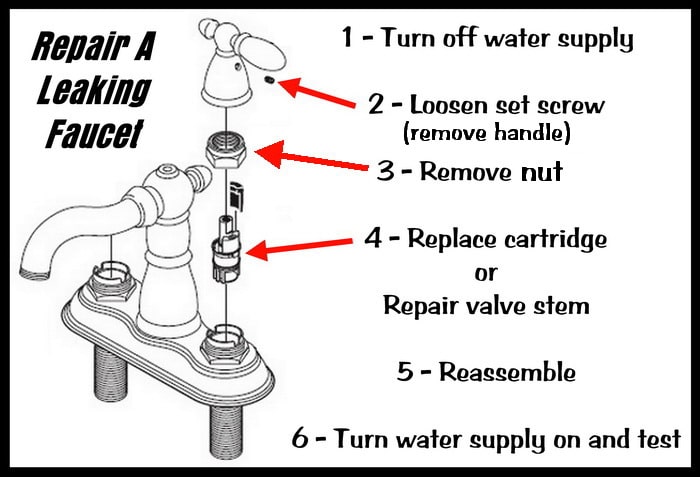
The steps to repair a leaky faucet are listed below:
- Get the supplies
- Switch off the main water supply
- Remove the tap handle
- Remove the valve stem cover
- Remove the valve stem assembly
- Remove the spindle washer
- Replace the old washer with the new one
- Reassemble or reassemble everything
Get the supplies:
You will need the following supplies to repair a leaking faucet:
- Sewer pliers
- Small slotted screwdriver
- Phillips screwdriver
- Replacement spindle disk
- Plumber’s grease
- Plumber tape
Switch off the main water supply: Once you’re done collecting supplies, you’re ready to go. First of all you have to completely switch off the hot and cold water supply lines connected to the tap. Don’t forget this, otherwise things will get out of control.
Remove the tap handle: Now you have to remove the tap handle. You will find that it is attached to the valve stem assembly of the faucet using a screw. Depending on your faucet condition, the screw may be in sight or under a decorative cap. Remove the cap to access the screw. Most decorative caps are easy to pry off. Finally, remove the screw using the Phillips screwdriver.
To remove the valve stem cover: At this point, there may be a valve stage assembly cover over the valve assembly. This is especially the case with one-hand taps. Remove the cover by unscrewing it with pliers.
To remove the valve stem assembly: You have come a long way. Now remove the valve stem assembly. You must completely unscrew the valve stem assembly and then pull it out of the faucet body.
Removing the spindle disc: After you successfully remove the valve stem assembly, quickly locate the old washer at the bottom of the valve assembly. You will find that a screw is holding the old washer in place. You now need to be careful as the screw can become deformed. It has been with water for a long time, so it is expected to be worn. Carefully remove the brass screw that secures the washer. After successful removal, clean the end of the washer holder thoroughly. Perfect cleaning ensures that the new washer sits cleanly in the valve seat.
Replace the old washer with the new one: It’s finally time to replace the old washer with the replacement washer. Spare parts are sold as a faucet repair kit, so finding a replacement is not a problem. You can also replace the O-ring to be on the safe side. Finally, secure the new washer in place with the brass screw.
Reassemble or reassemble everything: One last step is still and the tap is reassembled. You have to put everything back together as it was with the replacement pane. That’s it. You have successfully repaired a leaking compression cock. Did you find it easier than expected?
Leaking taps are undesirable and annoying, as mentioned in this post. Repairing a leaky compression tap is not that difficult if you have the right setting and tools. You can fall back on this article to fix a leaky faucet by following the steps above. Finally, enjoy a leak-free tap.